16 Mar

Easter bunny egg: the pattern

Hello sweeties,

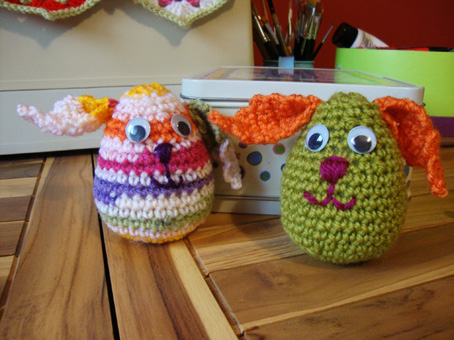
This is today, as promised, how to crochet your little bunny egg ! It is very simple and easy and I’ll try my best to make my explanations clear 😉

First, you have to choose your yarn and a crochet hook a little smaller then the one suggested on your yarn…to have a neat look and tight stitches….so the stuffing won’t appear between the stitches…

I made my bunny with a 100% acrylic yarn and choose a 3.5 mm crochet hook instead of the 4.5mm suggested on the yarn…

I’ll explain here the pattern using the U.K terms…Remember a dc in the U.K terms means a sc in the U.S terms ans a “maille serree” in the French terms…a “2-st dc decrease” means in french: 2 mailles serrees tirees ensemble…

The pattern is made mostly with dc…

The bunny is made with: one body-egg, 2 ears and one tail…

So? Are you readyyyyyyyyyyyy? let’s make it!

Let’s begin first with the body-egg part:

Round1: In a circle made with 4ch, crochet 10 dc.

Rnd2: make 2dc on every stitch of the previous round: that means 20 dc

Rnd3: 20dc

Rnd4: 30 dc (crochet one dc, 2dc, one dc, 2dc etc on every stitch of the previous round)

Rnd5 to Rnd11: 30dc (7 rounds of 30dc each)

Now, you have to begin the “decreasing” part:

Round12: 24 dc (1dc, 1dc, 1dc, 2-st dc decrease, 1dc, 1dc, 1dc, 2-st dc decrease, etc etc on every stitch of the previous rnd)

Rnd13: 24 dc

Rnd14: 18 dc  (1dc, 1dc, 2-st dc decrease, 1dc, 1dc, 2-st dc decrease, etc etc on every stitch of the previous round)

Rnd:15 18 dc

Rnd16: 15 dc (1dc, 1dc, 1dc, 1dc, 2-st dc decrease, 1dc, 1dc, 1dc, 1dc, 2-st dc decrease, etc etc on every stitch of the previous rnd)

Rnd17: 15 dc

Stuff here your egg!

Rnd18: 12 dc (1dc, 1dc, 1dc, 2-st dc decrease, 1dc, 1dc, 1dc, 2-st dc decrease, etc etc on every stitch of the previous rnd)

Rnd19: 6 dc (2-st dc decrease, 2-st dc decrease, etc etc)

Sew some stitches to close your egg!

You’ve got now an Easter egg…You can just make Easter eggs following the pattern above …Colorful, striped eggs etc

or you can continue to make your little bunny 😉

The Ears:

The ears are worked in rows. To make an ear:

Row1: Crochet on a row of 6ch, 6 dc

And continue following the graph below until row11:

You’ve got an ear ! Make another one!

You still have the tail to make and all the body parts of your little bunny will be ready 🙂

The tail: Worked in rounds.

Round 1: In a circle made of 3ch, crochet 6 dc.

Rnd2: 9 dc (1dc, 2dc, 1dc, 2dc on each stitch of the previous round)

Rnd3 and 4: 9 dc.

The tail is done! Your little bunny is almost ready…

You have just to sew all its parts together…

Fold in two each ear before sewing it to the body…

Sew two eyes, or use beads or glue ready-craft-eyes …

Sew the nose…

Stuff a little the tail before sewing it to the back of the body…

Your Easter bunny egg is ready 🙂

Happy crocheting my friend!

Sucrette

P.S: For any question, do not hesitate to e-mail me at: sucrette@lemondedesucrette.com and I’ll be more than happy to help!

14 Feb

LOVE

You were born together, and together you shall be forevermore.
You shall be together when the white wings of death scatter your days.
And, you shall be together even in the silent memory of God.
But let there be spaces in your togetherness,
And let the winds of the heavens dance between you.

Love one another, but make not a bond of love:
Let it rather be a moving sea between the shores of your souls.
Fill each others cup but drink not from one cup.
Give one another of your bread but eat not from the same loaf
Sing and dance together and be joyous, but let each one of you be alone,
Even as the strings of a lute are alone though they quiver with the same music.

Give your hearts, but not into each others keeping.
For only the hand of Life can contain your hearts.
And stand together yet not too near together:
For the pillars of the temple stand apart,
And the oak tree and the cypress grow not in each others shadow.

Gibran Kahlil Gibran


Happy Valentine’s day to you my special friends,

 May LOVE be always in your home and in your heart!

 Sucrette

 P.S: You can find the pattern of the small heart here!

13 Feb

The traditional granny square

Good morning sweet friends,

How was your weekend? Hope that it was a little less cold in your part of the world…Here it was sunshine with a good 18 celcius d. so yesterday the girls played outside and had so much fun after weeks of gray and rainy days stucked indoors 🙂 Sunshine again…yes spring is not so far anymore …

I’ve made more squares for my Love Birds blanket…I’m getting a little bored from this square 🙁 …so I must work on something else in parallell if I want to be able to finish it …yes 121 squares is something huge and I can not work it without crocheting another wip at the same time… for the distraction 😉

Some of you asked me how I begin a new row when I don’t want to change the color and cut the thread… Well I’ve made a small graphic for you to understand this small trick…it is so easy …

Here is the graphic of the traditional granny square I’m making for Love Birds (the first 4 rounds):

and here are the symbols used:

As you can see in the graphic, you have to close each round with a sc (U.S)  instead of crocheting one ch and a slip stitch. With this sc, you’ll be able to stay in the corner ( hope you’re understanding what I mean 🙂 ) and begin a new round with 3ch instead of the first dc (U.S) !

For each Love birds square, I crocheted the first 3 rounds with one color and then the next four rounds in another color…

and round8 with the lovely turquoise color (I’m so in love with this color, thank you so much for all your kind comments concerning my joining colors…now, thanks to you, the turquoise is surely a winner 🙂 ) and then I’ll join my squares with a line of sc (U.S) with the darker turquoise ! (You can see a small sample of the result in this previous post)

So, my sweeties, this is it! I have now to find a new wip so I can work on more than one project…yes, I am not a monogamous woman (is that an english word or translator is giving me wrong translations?????) I can never stick on one project at a time …

Have to leave you now… and go see my box-of-left-behind-wips 😉

Have a wonderful week!

Sucrette

P.S: Thank you so much Olga, Heidi, Carol and Cynthia  for the versatile Blogger award! That is really sweet from you 🙂 THANK YOU !


04 Jan

Sweet pot covers: A written and a graphic pattern

Hello Hello Hello!

Sweet morning to you all! This is for you my sweeties the tutorial of the jam pot covers! I’ve made a written one and a graphic one for those of you who prefer graphic patterns (like myself 😉 )

For the pot covers I made I used as yarn : Stylecraft special DK, a very good acrylic yarn, with a 3.5mm crochet hook. I still have some stylecraft leftover yarn from my Granny MONSTER I made back in 2010 🙂 I love leftovers 🙂

So? Are you readyyyyyyyyyyyyy? Prepare some leftover yarn, a good crochet hook … aaaaaaaaand… let’s dooooooooooooo it!

For this pattern I’ll use the U.K terms.

Remember a tr (U.K terms) = dc (U.S terms) = bride (France)

and a dc (U.K terms) = sc (U.S terms) = maille serree (France)

Written pattern:

Make 4 ch and close to obtain a circle.

Rnd1: Inside the circle, crochet 12 treble (U.K terms).

Rnd 2: Increase: crochet 2 tr. in every tr. of the previous rnd. Total: 24 tr 

Rnd3: Increase: crochet 1tr. on the first tr. of the previous rnd then 2 tr.on the second tr. of the previous rnd, 1tr, 2 tr, 1tr, 2tr etc etc to obtain in total: 36 tr

Rnd4: As round 3: 1tr, 2 tr, 1tr, 2tr etc etc … Total: 54 tr

Rnd5: As rnd 3 and 4: 1tr, 2tr, 1tr, 2tr etc etc … Total: 81tr

Rnd6: make 1tr on the first tr of the previous rnd then 1 ch. leaving one tr of the previous rnd empty. 1tr, 1ch, 1tr, 1ch etc

This round, round6, is made for the passage of the chain you’ll crochet after. You have to pull this chain and make a beautiful bow to transform your doily into a pot cover…(see next pic how the red chain has been inserted) 

Rnd7: Increase: 1tr on the tr of the previous round, 2tr on the chain of the previous round, 1tr, 2tr, 1tr, 2tr etc etc

Rnd8: 4dc on the first 4 tr of the previous round then 1dc-3ch-1dc on the 5th tr of the previous round so: 1dc, 1dc, 1dc, 1dc, 1dc-3ch-1dc,  1dc, 1dc, 1dc, 1dc, 1dc-3ch-1dc, etc etc

You have now a small doily 🙂

Crochet a chain of 100ch. to pass between the trebles of round 6.

Pull this chain and make a beautiful bow! You’ve done it 🙂

Graphic pattern:

Symbols used:

Round 1 to 7:

Round8:

That’s it! A very simple, quick project to use all your leftovers 🙂

You have now a beautiful jam pot cover to brighten up your kitchen table! or a small colorful doily… when you’ve already eaten all the jam 😉

Happy crocheting!

Sucrette

20 Dec

My vintage blanket: the edging

Good evening!

Just a quick post tonight to post the graphic of my vintage blanket’s edging…and to tell you THANK YOU for all your wonderful comments on my previous post! I am really lucky to have you all … and so happy everytime to share with you and read your sweet words…

So, here it is…

To make one picot crochet 3 ch and then 1 dc (or sc for the U.S crocheters) in the first ch.

I just love this edging…The picot are a little “pain in the a…” but the result really worth it … simple but beautiful don’t you think?

Have to go now….

Sweet dreams!

Sucrette